vegeta - benchmark opensource를 이용한 부하테스트
Overview
개발을 진행하면서 내가 만든 api가 어느정도 부하를 받을 수 있는지에 대해서 테스트를 해야되는 경우가 존재합니다. 여러 툴이 존재하지만 이번에는 오픈소스인 vegeta을 이용한 방법에 대해서 소개하겠습니다.
부하테스트란
아주 쉽게 설명을 하면 얼마나 많은 트래픽을 감당할 수 있냐? 라는 질문에 대한 테스트입니다. 스트레스 테스트라는 이름으로도 사용됩니다.
강제로 트래픽을 만들어서 실제 서비스 환경에서 많은 트래픽을 받았을 경우에 얼마나 오래 걸리는지, 그리고 그것을 통해서 어떤 부분이 문제가 되는지에 대해서 테스트를 진행합니다.
vegeta란
오픈소스로 사용가능한 친구입니다. 여러 부하테스트 툴이 있는 걸로 알고 있습니다. 비슷한 툴로는 jmeter, Locust 등이 존재합니다.
이전에는 jmeter을 이용해서 부하테스트를 진행해본 적이 있습니다. 해당 툴은 일단 기본적으로 ui가 제공해준다는 부분이 있습니다. 설정에 있어서 모든 부분을 클릭으로 가능한 부분이 이용할 수 있었습니다. 하지만 툴을 다루는데 어느정도 익숙함이 있어야지 잘 다룰 수 있는 부분이 존재했습니다.
그런 의미에서 가볍게 사용할 수 있는 vegeta라는 친구를 알게 되었고 사용하게 되었습니다.
설치법
저는 현재 맥을 사용하고 있기 때문에 맥을 기준으로 설명하겠습니다.
$ brew update && brew install vegeta
사용가능한 커맨드
Usage: vegeta [global flags] <command> [command flags]

global flags:
  -cpus int
    	Number of CPUs to use (defaults to the number of CPUs you have)
  -profile string
    	Enable profiling of [cpu, heap]
  -version
    	Print version and exit

attack command:
  -body string
    	Requests body file
  -cert string
    	TLS client PEM encoded certificate file
  -chunked
    	Send body with chunked transfer encoding
  -connections int
    	Max open idle connections per target host (default 10000)
  -duration duration
    	Duration of the test [0 = forever]
  -format string
    	Targets format [http, json] (default "http")
  -h2c
    	Send HTTP/2 requests without TLS encryption
  -header value
    	Request header
  -http2
    	Send HTTP/2 requests when supported by the server (default true)
  -insecure
    	Ignore invalid server TLS certificates
  -keepalive
    	Use persistent connections (default true)
  -key string
    	TLS client PEM encoded private key file
  -laddr value
    	Local IP address (default 0.0.0.0)
  -lazy
    	Read targets lazily
  -max-body value
    	Maximum number of bytes to capture from response bodies. [-1 = no limit] (default -1)
  -max-workers uint
    	Maximum number of workers (default 18446744073709551615)
  -name string
    	Attack name
  -output string
    	Output file (default "stdout")
  -proxy-header value
    	Proxy CONNECT header
  -rate value
    	Number of requests per time unit [0 = infinity] (default 50/1s)
  -redirects int
    	Number of redirects to follow. -1 will not follow but marks as success (default 10)
  -resolvers value
    	List of addresses (ip:port) to use for DNS resolution. Disables use of local system DNS. (comma separated list)
  -root-certs value
    	TLS root certificate files (comma separated list)
  -targets string
    	Targets file (default "stdin")
  -timeout duration
    	Requests timeout (default 30s)
  -unix-socket string
    	Connect over a unix socket. This overrides the host address in target URLs
  -workers uint
    	Initial number of workers (default 10)

encode command:
  -output string
    	Output file (default "stdout")
  -to string
    	Output encoding [csv, gob, json] (default "json")

plot command:
  -output string
    	Output file (default "stdout")
  -threshold int
    	Threshold of data points above which series are downsampled. (default 4000)
  -title string
    	Title and header of the resulting HTML page (default "Vegeta Plot")

report command:
  -buckets string
    	Histogram buckets, e.g.: "[0,1ms,10ms]"
  -every duration
    	Report interval
  -output string
    	Output file (default "stdout")
  -type string
    	Report type to generate [text, json, hist[buckets], hdrplot] (default "text")

examples:
  echo "GET http://localhost/" | vegeta attack -duration=5s | tee results.bin | vegeta report
  vegeta report -type=json results.bin > metrics.json
  cat results.bin | vegeta plot > plot.html
  cat results.bin | vegeta report -type="hist[0,100ms,200ms,300ms]"
정말로 엄청나게 많은 키워드를 가지고 있습니다. 위에 해당하는 키워드들과 사용법에 대해서 가볍게 설명드리겠습니다. 자세한 설명은 github을 참고하세요!
기본 커맨드 설명
attack
공격을 어떻게 할 것인지에 대한 명령을 할 수 있습니다.
-duration option
Specifies the amount of time to issue request to the targets. The internal concurrency structure’s setup has this value as a variable. The actual run time of the test can be longer than specified due to the responses delay. Use 0 for an infinite attack.
-duration=5s=> 5초 동안 요청
얼마동안 공격을 할 것인가 대한 값을 넣으면 됩니다. 위에 커맨드 같은 경우 5초 동안 공격을 하게 됩니다.
-rate option
Specifies the request rate per time unit to issue against the targets. The actual request rate can vary slightly due to things like garbage collection, but overall it should stay very close to the specified. If no time unit is provided, 1s is used.
-rate=10=> host당 1초에 10번 요청
기본적으로 1초에 몇개를 보낼 것인지 결정합니다. 설정하지 않은 경우 50/1s입니다. 만약 0으로 하게 되면 무한으로 요청보내게 되는데 그럴 경우에는 추가적으로 max-worker의 수를 지정해야됩니다. 여기서 말하는 max-worker는 vegeta를 실행할 때 같이 설정할 수 있는 option입니다.
-max-workers option
Specifies the maximum number of workers used in the attack. It can be used to control the concurrency level used by an attack.
worker은 만들어져서 공격을하게 되는데 최대 몇개의 worker을 사용할 것인가에 해당하는 값을 지정할 수 있습니다.
report
결과값에 대해서 어떤 형식으로 볼 것인지에 대해서 설정하는 command 입니다.
default -type=text
$ echo "GET http://127.0.0.1:9997/" | vegeta attack -duration=5s | vegeta report
Requests      [total, rate, throughput]         250, 50.20, 50.20
Duration      [total, attack, wait]             4.98s, 4.98s, 369.149µs
Latencies     [min, mean, 50, 90, 95, 99, max]  256.785µs, 468.522µs, 471.66µs, 537.929µs, 575.639µs, 942.898µs, 3.66ms
Bytes In      [total, mean]                     1000, 4.00
Bytes Out     [total, mean]                     0, 0.00
Success       [ratio]                           100.00%
Status Codes  [code:count]                      200:250
-type=json
$ echo "GET http://127.0.0.1:9997/" | vegeta attack -duration=5s | vegeta report -type=json > result.json
{
  "latencies": {
    "total": 121239389,
    "mean": 484957,
    "50th": 477588,
    "90th": 524619,
    "95th": 583750,
    "99th": 814515,
    "max": 6793623,
    "min": 262009
  },
  "bytes_in": {
    "total": 1000,
    "mean": 4
  },
  "bytes_out": {
    "total": 0,
    "mean": 0
  },
  "earliest": "2020-12-21T00:59:10.755216634+09:00",
  "latest": "2020-12-21T00:59:15.731910157+09:00",
  "end": "2020-12-21T00:59:15.732195838+09:00",
  "duration": 4976693523,
  "wait": 285681,
  "requests": 250,
  "rate": 50.23415624141097,
  "throughput": 50.231272776682474,
  "success": 1,
  "status_codes": {
    "200": 250
  },
  "errors": []
}
-type=type=hist
$ echo "GET http://127.0.0.1:9997/" | vegeta attack -duration=5s | vegeta report -type='hist[0, 2ms, 4ms, 6ms, 8ms, 10ms]'
Bucket         #    %        Histogram
[0s,    2ms]   250  100.00%  ###########################################################################
[2ms,   4ms]   0    0.00%
[4ms,   6ms]   0    0.00%
[6ms,   8ms]   0    0.00%
[8ms,   10ms]  0    0.00%
[10ms,  +Inf]  0    0.00%
plot
해당 데이터를 시각화하는 데이터로 만들어 줍니다. 기본적으로 html 파일로 만들어주면 거기서 여러 데이터를 동시에 비교하면서 볼 수 있습니다.
해당 부분은 밑에 예시에서 어떻게 하는지 그리고 어떤 모습인지 보여드리겠습니다.
어떻게 사용하면 되나요?
기본 사용
$ echo "GET http://127.0.0.1:9997/" | vegeta attack -duration=5s | vegeta report
어떤 곳으로 요청을 보내고 싶은지에 대해서 작성합니다. 그것을 shell에서 사용하는 pipeline으로 계속 연결해서 사용하게 됩니다.
5초 동안 (-duration=5s) 1초에 50번씩 (-rate의 default), GET http://127.0.0.1:9997/로 요청을 보냅니다.
여러 target을 공격하고 싶은 경우
$ vegeta attack -rate=1 -duration=5s -targets=targets.txt | vegeta report
위에 명령어를 실행하기 전에는 targets.txt이라는 파일을 만들어야 합니다. 반드시인지는 모르겠지만 파일로 관리하는게 훨씬 편할 것 같다는 생각은 합니다! 아무래도 cli이기 때문에 추가적으로 여러 host를 테스트하고 싶을 때는 힘들어질 것이라고 생각합니다.
GET http://127.0.0.1:9997

POST http://127.0.0.1:9997
X-Account-ID: 99
# Can make comment
@./post.json
이렇게 text을 만들었을 경우 2개에 GET http://127.0.0.1:9997, POST http://127.0.0.1:9997에 보내게 됩니다.
X-Account-ID: 99는 헤더에 해당하는 부분이며 계속 추가할 수 있습니다. @./post.json는 post를 보낼 때 body를 파일로 관리해서 보낼 수 있습니다.
{
  "hello": "world",
  "안녕": "테스트"
}
실제로 이렇게 보냈을 때 어떻게 나왔는지 볼까요?
명령어
$ vegeta attack -rate=1 -duration=5s -targets=targets.txt | vegeta report
test server code
@GetMapping("/")
public String getRequest(HttpServletRequest httpRequest) {
    log.info("[GET] host={}", httpRequest.getRemoteHost());
    return "hihi";
}

@PostMapping("/")
public String postRequest(HttpServletRequest httpRequest, @RequestBody String body) {
    log.info("[POST] host={}", httpRequest.getRemoteHost());
    log.info("X-Account-ID={}", httpRequest.getHeader("X-Account-ID"));
    log.info("request={}", body);

    return "hihi";
}
console
---

2020-12-21 01:08:42.093  INFO 23160 --- [nio-9997-exec-1] c.f.end.controller.app.AppApplication    : [GET] host=127.0.0.1
2020-12-21 01:08:43.041  INFO 23160 --- [nio-9997-exec-2] c.f.end.controller.app.AppApplication    : [POST] host=127.0.0.1
2020-12-21 01:08:43.041  INFO 23160 --- [nio-9997-exec-2] c.f.end.controller.app.AppApplication    : X-Account-ID=99
2020-12-21 01:08:43.041  INFO 23160 --- [nio-9997-exec-2] c.f.end.controller.app.AppApplication    : request={
  "hello": "world",
  "안녕": "테스트"
}

2020-12-21 01:08:44.033  INFO 23160 --- [nio-9997-exec-3] c.f.end.controller.app.AppApplication    : [GET] host=127.0.0.1
2020-12-21 01:08:45.032  INFO 23160 --- [nio-9997-exec-4] c.f.end.controller.app.AppApplication    : [POST] host=127.0.0.1
2020-12-21 01:08:45.032  INFO 23160 --- [nio-9997-exec-4] c.f.end.controller.app.AppApplication    : X-Account-ID=99
2020-12-21 01:08:45.032  INFO 23160 --- [nio-9997-exec-4] c.f.end.controller.app.AppApplication    : request={
  "hello": "world",
  "안녕": "테스트"
}

2020-12-21 01:08:46.036  INFO 23160 --- [nio-9997-exec-5] c.f.end.controller.app.AppApplication    : [GET] host=127.0.0.1
1초 1번, 5초 요청을 보냈습니다. body에서 해당 데이터가 잘 받아서 사용되며 뿐만 아니라 헤더에서 지정했던 값들도 잘 가져와는 것을 알 수 있습니다.
보시게 되면
targets.txt에 있는 모든 친구들을 한번씩 보내게 됩니다. 이 부분이 조금 유의해서 진행해야됩니다.targets.txt있는 친구들 전체를 1번 보내는 것이 아닌 순차적으로 1번씩 보내게 됩니다. (위와 세팅과 같은 경우 GET -> POST -> GET -> POST -> GET)
plot 이용한 시각화
$ vegeta attack -name=50qps -rate=50 -duration=5s -targets=targets.txt > results.50qps.bin
$ cat results.50qps.bin | vegeta plot > plot.50qps.html
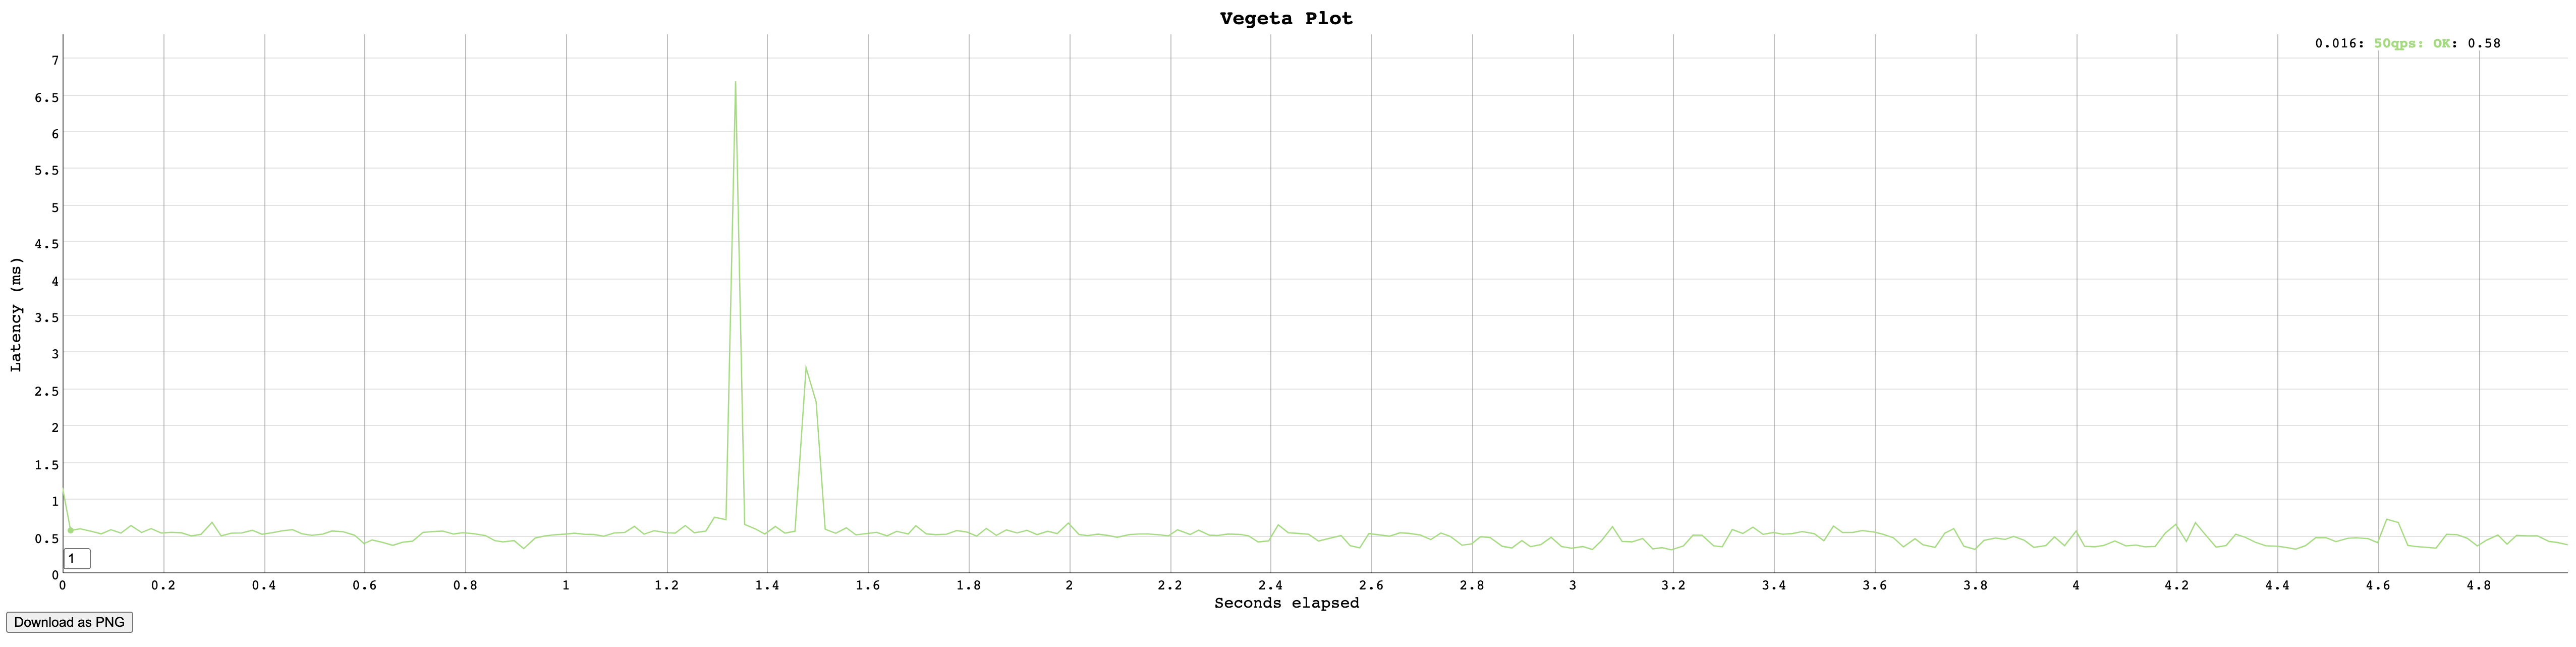 위와 같은 html 파일을 받을 수 있습니다.
팁
Go 언어에서 해당 라이브러리를 바로 사용할 수 있습니다. 혹시 Go 언어를 사용하실 수 있다면 부하테스트 진행을 코들화를 할 수 있습니다.
code
targets.txt과 예제에 있는 vegeta shell script이 있습니다.
마무리
다른 툴처럼 엄청나게 세밀한 설정이 불가능합니다. 하지만 세밀한 세팅이 필요하지 않고 부하테스트를 진행해보고 싶은 경우 쉽게 사용할 수 있다고 생각합니다.
Ref
https://github.com/tsenart/vegeta

Leave a comment